What are PowerApps
So basically we using PowerApps to create apps that take data
from a choice of sources configured to run on a variety of platforms
such as tablets and phones without requiring any coding skills. This
basically gives simple and yet powerful development tools to non-coders,
helping cut out developers from tedious process of making simplistic
applications. What’s interesting is that Microsoft has shown incredible
flexibility in terms of platform and storage services. Users of
PowerApps can build their applications to run on Android, iOS or the
Web. In terms of storage, Microsoft does not tie down users with its own
Azure cloud/OneDrive, in fact letting them use competitor’s services
such as Dropbox, SharePoint Online and others. PowerApp creations can be
accessed anywhere but since they are not native to mobile, they are
accessed and run through Microsoft’s PowerApp which prevents them from
being used to create a consumer product.

You can also build an app from a template.
These templates are based on fictitious data in a cloud account, such
as Dropbox, OneDrive, or Google Drive. Explore specific screens and
controls to understand how they're configured, and experiment with
customization to build expertise that you can apply to your own apps.
What would you say… they do here?
•Mobile Apps built by citizen developers
•Another tool in the Office365 suite of apps and services
•Glue for cloud services and data
What PowerApps are *not*
Setting Expectations:
•They are not general consumer apps
•PowerApps is NOT a replacement for InfoPath / SharePoint Designer
•PowerApps and Flows were NOT written *for* SharePoint
•SharePoint and Office 365 have connectors for PowerApps and Flows
•Devs definitely not ‘out of the picture’ as some would report:
•Connections, Managed APIs, Azure Apps, Logic Apps, and more…
PowerApps and related things
•Connections
•Microsoft Flow (Logic Apps, Logic Flows)
•Actions
•Conditions
Installation
I am using windows 10 and it works well. As per Microsoft, it is supported in Windows 8.1 also. Get PowerApps to create , use and share custom build apps with your team and organization.
1. Go to ->App store.

2. search for "PowerApss".

3. Click on the Free button.

4. it will start downloading for installation.

5. You will get the PowerApps studio in all apps menu.
Demo:
Let’ straight jump in and see
PowerApps in action.
Let’s connect to a SharePoint custom
list and display the data in PowerApps form without any customization.
How to customize and add Logic flows
– may be some other day in another blog.
- Login in to SharePoint Online site and create a custom list. Let’s say, you have a list “Vendor Contacts” with some data.
- Look for installed PowerApps in your machine. Note: Make sure you are logged in to office 365 tenant before you start creating the form.

- Select the Device Phone or tablet.
- In PowerApps you can start creating forms in 3 ways. Either by selecting “Start from a template” OR “Start from your Data” OR “Start from scratch”
- Since, we are selecting a very basic form, let’s select the second option “Start from your Data”
- Select “Add a Connection” select “SharePoint Online”.

- Once, logged in, click on “New Site” and enter the Site URL and select the List. In our case it is “Vendor Contacts”, click on Connect
- After a minute or two, PowerApps builds rich UI including search functionality.
- On the left side, you see different screens, called as Views. It is something similar to Slides in PowerPoint. For our SharePoint connected List, you see 3 views.
Browse
View—Gives the List views.
Detail
Screen—Details all the columns
Edit
Screen—Important view, which allows you edit the screen.
As
you can see in PowerApps windows, you can heavily customize look and feel.

- Select the Browse view and Select Run on the ribbon.
Sharing:
In traditional applications, we
deploy the custom form to a list/library and provide the Link to end user. In
PowerApps, instead of that, you share the form that you have developed.
- On the top right corner, click on the Share icon, enter the user email address and click on Share.
- End user will receive an email a link to open the form. The Shared user need to have PowerApps installed to open the form.

Notes:
- PowerApps shows only Custom List from SharePoint connection. It will not list out any other Lists like Contacts List, Task List etc.
- Power apps is too slow to load and sometime have to wait for longtime.
- The list must exist inside a sub site. If you try to open site collection URL, it will throw an error saying “The tables did not load correctly. Please try again.”.
SharePoint and PowerApps
Create new PowerApps from your SharePoint Online list in the browser
With the launch of the new SharePoint modern list experience will come
the ability to create an app for a list from directly within the
SharePoint list experience. Specifically, the new SharePoint list view
menu you will now have an option to create a PowerApp for this list.

A new PowerApps terms to learn:
•PowerApps
•Flows
•Connections
•Functions
•Collections
•Patch
•… still evolving …
Connections
What IS a ‘connection’?
•Data or Service
•Credentials / Instance
Available Connections… at the moment
•
|
AzureBlob
|
•
|
OneDrive for Business
|
•
|
Box
|
•
|
Outlook.com
|
•
|
Dropbox
|
•
|
Project Online
|
•
|
Dynamics CRM Online
|
•
|
RSS
|
•
|
Facebook
|
•
|
Salesforce
|
•
|
FTP
|
•
|
SendGrid
|
•
|
GitHub
|
•
|
Service Bus
|
•
|
Google Drive
|
•
|
SFTP
|
•
|
Instagram
|
•
|
SharePoint Online
|
•
|
MailChimp
|
•
|
Slack
|
•
|
Mandrill
|
•
|
SQL Azure
|
•
|
Microsoft Translator
|
•
|
Trello
|
•
|
Office 365 Outlook
|
•
|
Twilio
|
•
|
Office 365 Users
|
•
|
Twitter
|
•
|
Office365 Video
|
•
|
WunderList
|
•
|
OneDrive
|
•
|
Yammer
|
Introducing Microsoft Flow
Case 1:Suppose sales teams are constantly meeting people and following up over email. They want to ensure that don't miss any of these leads, but re-typing information from emails into our CRM system is tedious.
Case 2: We get hundreds of emails every day, and our notification options are all-or-nothing. It’s hard to keep up with all that traffic when we’re travelling. We'd like to get an SMS when specific people like a key customer prospect reach out directly to me.
Case 3: Someone work with advertise agency who create content and upload large files to OneDrive or Dropbox accounts. Teams want to know right when the latest files arrive, without having to check every 30 minutes, and then they want to transfer a backup to SharePoint Online as soon as it comes through.
Microsoft Flow makes it possible to automate all of these scenarios and many, many more. Business users can connect their accounts, take advantage of pre-built templates, and create their own flows in an easy visual designer that works anywhere on the web.
When do you use Flows?
•Click events in PowerApps
•Event-driven ‘watcher’ apps
Is this specific to SharePoint and can it be used to replace SharePoint workflows?
No. It is not specific to SharePoint; but you can use it for SharePoint. In SharePoint it is currently enabled for few events like item added/updated. You can’t use Flow for deletion. This may appear when the product goes public.Also it always depends on the Customer requirements on SharePoint designer workflow replacement.
How do I get it?
It is currently under Preview. Go to https://flow.microsoft.com and signup. You need to have Microsoft account to subscribe to this.
Demo
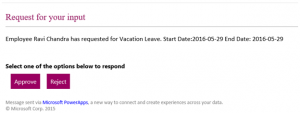
Scenario: Lets say, you have a custom Leave Request List in
SharePoint. When the new items are created the Project Manager should
get an approval email. The Manager should have Approve/Reject button in
the email. On both Approve/Reject, the requester should get an email.
Note: As this blogs mainly talks on Microsoft Flow, I will skip SharePoint customization and validation part to you.
The form will look something like below.

As mentioned earlier, there is no detailed debugging procedure available. You can check the status of each condition at run time. Once the logic executes, they will show in Green color.

Conclusion:
Go for SharePoint Designer workflow if,
Note: As this blogs mainly talks on Microsoft Flow, I will skip SharePoint customization and validation part to you.
- Create a Custom List say “Leave Request” with the below columns.
| Column Name | Type |
| Description(Title) | Single line of text |
| Leave Requests | Sick
Personal Vacation Compulsory Leave |
| Comments | Multiple lines of text |
| Start Date | Date and Time |
| End Date | Date and Time |
| Total Number of Days Requested | Number |

- Creating the Flow
- Login to https://flow.microsoft.com using Office 365 account.
- Click on My Flows and the click on Create New Flow.
- Type SharePoint and select “SharePoint Online – When a new item is created”.

- Enter the Site URL, and select the Custom List. In our case list name is Leave Requests.

- Click on Add an Action. Select Action “Office 365 Outlook – Send approval email” and fill out the Details. This will give us 2 buttons Approve/Reject in the email.

- Fill out the details. Refer the image below.

- Adding the Condition
- Click on + symbol at the bottom and select “Add a Condition”.
- Fill out the below details. Refer the image below.
- Object Name: Selected Option.
- Condition: is equal to
- Value: Approve

- This Control also adds 2 conditions.
- Under Yes, Select Send Email control and Fill out the details. Refer the image below. Repeat the same for “No” condition.

- Under Yes, Select Send Email control and Fill out the details. Refer the image below. Repeat the same for “No” condition.
- Below is the final look of our Flow.

- Give a name to your Flow and Save the changes. Congratulations! Now your workflow is complete and ready to use.
- Testing:
- Make sure, under My Flows your new workflow is Turned on.

- Create an Item in your SharePoint “Leave Request” and after few
seconds, the approver receives an email with Approve and Reject option.
- Clicking on Approve, will execute the Approve section in flow and vice versa when it is Rejected.
- Make sure, under My Flows your new workflow is Turned on.


As mentioned earlier, there is no detailed debugging procedure available. You can check the status of each condition at run time. Once the logic executes, they will show in Green color.

Conclusion:
Go for SharePoint Designer workflow if,
- If you have a complex logic which includes calling REST end Points, Dictionary values etc.
- CRUD operations on multiple SharePoint Lists.
- Need to track workflow activities using Task List and History List.
- Planning to reuse the same workflow across multiple site collections and multiple Lists. Go for Microsoft Flow,
- Your IT Governance policy doesn’t allow creating custom workflow using SPD.
- Allow end User to create workflow based on their individual needs. Thereby reducing dependency on IT.
- Your workflow needs to connect multiple non SharePoint applications.
- You want to have a Lazy approval, so that user can Approve/Reject in their email.
Thank you hope it helps you...